Showing posts with label May 2011. Show all posts

Saturday, May 28, 2011

The sweetness of pink...


This started out as a full sized card, but as I worked on it I decided to make a smaller card and add it to the full sized card. So it's a card front with a smaller card attached. I've used papers from my stash that were already cut so I don't know who makes them. I have seen so many beautiful cards using all of the images I used for my card, #3011 Tilda with Straw Hat, (sorry she's not available at this time) #560 Wheel Barrow (this is only available in the Mini version at this time and #218 Sweet Tilda, she is available at this time.

A friend of mine recently bought some fabulous Marianne Designs doily dies. On the front of my card is one of those doilies which she cut for me. I cut it in fourths and added two of those beneath a couple of my panels. I did the clouds with chalk.

Here is my card...


An angular view of my card...


Here is a closer view of Tilda and the Wheel Barrow...Tilda is cut out and mounted with pop dots over the Barrow...


I didn't use flowers on this card as I didn't want to detract from the beautiful Tulips in the Wheel Barrow.

Here is how I finished the inside of my card...


Here is a close up of my Sweet Tilda...I colored her on Cryogen White then cut her out with my Spellbinder's circle die. I think I got her a little crooked...


Okay, now for those who are interested in the Copics I used, here is the list...

All leaves - G94,82,40
Flowers, Socks, Dress - R85,83,81
Wheel Barrow - E30,34,35, Ni,3,5,6
Skin - E000,01,01,11
Shies - E30,m34,35
Hat - C00,01
Hair - E35, Y26,21

Rhinestones from my stash.
Cardstock - SU Pirouette Pink and Bazzill White

Thanks so much for stopping by for a visit.
Hugs,
Barb

Wednesday, May 25, 2011

Treat Box Thank Yous.....

Any of you who have children in school know just how busy the end of the year can be. I'm experiencing that right now as the girls wrap up their final day of the semester at Parent's Day Out and in just one week, Jordan will be out of school for the summer. Thank goodness there are a few alternatives for them. The girls will pick up PDO after just a short weeks vacation and go through the summer. Jordan is signed up for several summer camps through the Y and he is quite excited about that!

SOOOOOO, I've been busy as a beaver making small altered items for the teachers. However, I owe several people in my Sunday school class a huge THANK YOU for helping me out during my hubby's last stint in the hospital. Meals were provided and we even had a gal come over to the house to watch the twins one afternoon so that Bill and I could go to a movie! What a blessing they all have been.

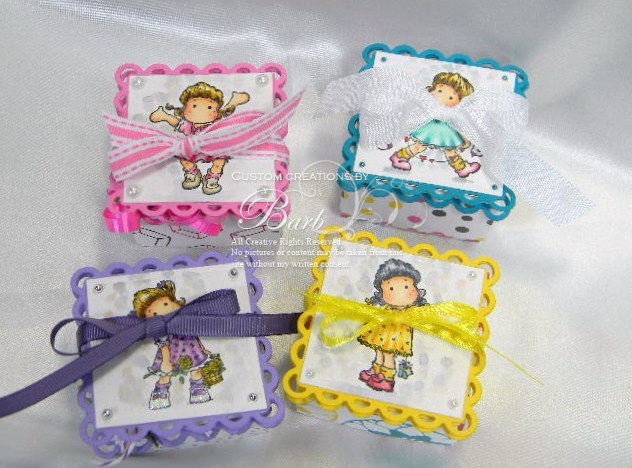
My teacher gifts are finished and will be posted at the beginning of June. But as I was cleaning out a drawer the other day I ran across instructions for making these sweet little folded boxes that don't require any glue. I made each of the following boxes from a 5 3/4" square for the bottom and 6" square for the top. That way they fit together really well. I dug out some paper and got busy. Here's what I came up with...


For each of these I used the same formula, just different embellishments. I used Spellbinder Scalloped Square Lace die, Spellbinder square die, a sentiment from Whipper Snappers, flowers from Wild Orchid crafts, Marianne leaf die for some, Baker's twine, assorted pearls from my stash and ribbon from my stash.

I've used 4 different Magnolia Mini's all available from Diana here. All images were colored with Copic Markers and the shadows were done with Distress Inks. I'm sorry, I didn't keep track of the colors I used except for the distress inks. I used Weathered Wood and Tattered Rose. As you can see I made the tops to be Easel Cards...what fun!

Here are closeups of each little box...
#3050 Mini Tilda with Heart Lace

#293 Mini Tilda with Small Gift

#250 Mini Tilda with Butterfly Dress

and finally, #241 Mini Dancing Party Tilda


These next two show you how I did the candy inside each box. I used Hershey Nuggets and cut a piece of matching dp 1" X 3", used a little Scor-tape on the end and wrapped each nugget. These little boxes hold exactly 6 pieces of candy perfectly...


The sentiment on the inside is from Whipper Snapper and I stamped each one before I assembled the Easel together. Then I just used some flowers and/or pearls as the stoppers.


To keep the boxes held together I tied a piece of ribbon around each one. None of the recipients of these boxes are crafty, so I will have to show them how it works. Fortunately I won't have to tell them how to eat the chocolate!


I hope they will enjoy these small tokens of appreciation as much as I enjoyed making them and praying for each giving person who has helped us so much.

I always look forward to getting feed-back from you, so please feel free to post a comment!

Hugs,
Barb

Monday, May 16, 2011

May Magnolia-licious Blog Hop - Goin' To the Chappel!

Well, I'm the last stop on the blog hop and I sure hope that you've enjoyed your visits to the other DT blogs to see what gorgeous creations they came up with for the wedding theme. You should be arriving here from Sharon's blog. If somehow you got mixed up you can always head back to Magnolia-licious Highlites and find the order of the hop.

So here is the project I made. Since we were to feature a Scor-Pal project as part of our creation, I chose the Wedding Chair. It was fairly simple to put together and decorate and I had lots of fun with the flowers and pearls. I used Magnolia Wedding Collection paper for my chair and repeated this in my Wedding CD card.

Here are a couple of pictures of the chair, which is actually a box you could put those little almond candies in, or what ever your heart desires.


The ribbon ties completely around the box. I've cut two slits on each side of the Vellum skirt to slide the ribbon through and then tied a bow on the top.


I had seen a CD card made by Pam Sparks here some time ago and thought it would make a great card. Well my idea fell a little short of what I had really envisioned, but that's okay. You still get the idea. I used #660 Wedding background on the front of the CD while inside I used #168 Loving Bridal Couple.


I cut through the the center of the image plus the backing pink paper and the lining paper on the inside of the CD. I applied some Vellum over the Wedding Collection paper on the inside which matches the vellum on the chair. Both of these images are available from Diana at Magnolia-licious.

Here's what the inside looks like...


A close up of the Bridal Couple...


I finished the back of the CD case as well. Here is what it looks like when it's fully open...


All flowers are from Wild Orchid Crafts, pearls are from my stash as is the DP. The pretty leaf dies are from Joy Crafts. I used Copic Markers to color my images.

Thanks for joining in the blog hop today. I hope we've inspired you well enough to jump into the challenge and make something using a Scor-pal technique with a wedding theme.

Hugs,
Barb

Thursday, May 12, 2011

A faithful friend...

Hello again blogging friends. I have another card to share with you. This time I used Edwin, since he is so sadly ignored in my card making. I know I'm not the only one who has a hard time with making suitable guy cards! You will find my card recipe at the end of this post and all the images are from Diana at Magnolia-licious. Fabulous prices, fabulous service and in-store credit now available each time you purchase from her. How great is that?

I found this gorgeous dp at my LLS and fell in love with it and knew exactly which image I would use with it. It is by Creative Imaginations and I paired it with some SU Taken with Teal and Chocolate Chip.

I have quite a few pictures, so I won't bore you with chit chat...here is my card front...


A couple of artistic shots from the side...


I love to get close up shots of my coloring and here are a couple for you...


Finally a simple inside. Who could be a more faithful friend that a dog?! So Rufas gets a page all to himself...


Card Recipe...

Images - #120 Edwin with Butterfly
#655 Romantic Sunset
#402 Rufus the Dog

DP - Creative Imaginations
CS - SU
Buttons and twine - SU
Sentiment - Cuddly Buddly
Butterflies - MS Punch
Pearls - stash

Copics used...

E000,00,01,11,13,15,17,19,25,30,31,33,34,35,40,41,42,43
BG 10,72,75
N7,5,3
YR12,14,30,23

I hope you've enjoyed your visit to my blog today. I have something very special I'm working on for the Magnolia-licious Blog Hop on the 16th. I'll look forward to visiting with you again soon.

Hugs,
Barb

Sunday, May 8, 2011

Better late than never....


Some things are better late than never and this is just the case with my DT project for May. My hubby's brief set back with MRSA and two more surgeries left me a little short handed and out of breath for a while. But in the end, I've managed to snatch a few spare moments to get some crafting done. Our fabulous head designer, Suzanne Dean, (who is utterly amazing) is the host of the sketch this month. Even though I couldn't participate on time, I still worked away on my card. I hope you'll find the time to check it out at Magnolia-licious Highlites blog and join in the fun this month. There are always delightful prizes to win from our extremely generous Diana.

Okay, so on to my card. For my image I chose #275 TILDA WITH LACE JEANS and she is available here at Diana's online shop. She is also newly available in the Mini version! I used my brand new Marianne Designs Doily Die. I thought these two paired beautifully together.

Here is the front view of my card....


Even though I had only short spurts of creative time, it was pure delight to make a girly card with lots of flowers and pearls again...do you see those pretty cut away leaves on the top? This is also a new die I recently purchased by Marianne Designs. I'm so in love with it. The smaller leaf groups are a die from Joy crafts. Ohhhhh! I'm lovin' it!

Here is a closer view of Tilda. I paper pieced her bow and overalls and colored the rest of her with Copics. I didn't realize until I was putting it all together that the shirt should have been colored something other than an exact match to the dp. Oh well, live and learn...

If you'll also notice, I put a piece of cardstock behind the doily die to make it stand out better. All flowers are from Wild Orchid Crafts.


These are the artistic views...left....


and right...


I finished the inside of my card by repeating the doily and added a small flower cluster with a ribbon and bow and more of those yummy leaves. All the pearls are from my stash. The dp was a gift from a friend and is from Melissa Frances. I absolutely adore her papers.

Finally I used my Cuttlebug corner dies to fancy up the notation panel.

I'm so glad that you stopped by to visit today. I'm hoping that I'll be back on track very soon and jump into the arena with my DT stuff for June...

Hugs,
Barb

Sunday, May 1, 2011

Just a few more card fronts....

In my little chips of time, I've done a few more card fronts for Diana. Believe me, my crafting time is more like Morse Code with dots and dashes. LOL! Such is life for me these days I guess.

The children are busy and active. Jordan will start up with swimming lessons again on Tuesday evening - something I had to drop while Bill was in the hospital and during his convalescence here at home. He goes for another follow up appointment and possibly get a walking cast put on. That will free him up from those blasted crutches...wooohooo!

So, in the dots and dashes of my days, I've managed to put a few more card fronts to send Diana for CHA coming up next month!

Here is what I've come up with....

This is #293 Tilda with a small gift Mini...

I used Magnolia Butterfly Collection dp with SU Taken with Teal and Bazzill white. Sentiment is from SU. All the flowers are from WOC, ribbon is from my stash. I didn't keep track of the copics I used to color her with. Butterflies are from various punches I have.


This next is also a birthday card front using #233 Congratulation Tilda Mini. The DP is from my stash, the card stock is from SU. Pearls and ribbon from my stash. Sentiment again is from SU. I used the Magnolia Vintage Lace die to an accent. Pearls are from my stash.


Oh I love how this one turned out! The dp is some digital I had on hand from Bearly Mine Designs. I did the window panel #532 Romantic Window and cut out all the small window pieces. I then attached some acetate behind it. Then I colored #293 Mini Tilda with Small gift and popped her panel up behind the window. I like the way she is peeking out through the window. I added the scalloped panel popped up also and then laid it all down on a white panel. The flowers are all from WOC. I put little #174 Edwin wants a hug in the corner and then used a sentiment from Cuddly Buddly that I won in their big give away.


This last piece is actually a belly band which I made to go around an envelope box which contained her birthday card. For this image I embossed the very pretty #609 Shooting Stars and then stamped #241 Dancing Party Tilda Mini - isn't she so cute! The sentiment is from SU, the pearls are from my stash.


I'm always so grateful that you take time out of your busy schedules to visit my blog. Hopefully one day soon, life will regain a normal routine and I'll have the time to visit your blogs and leave you some love.

Hugs,
Barb