Showing posts with label Magnolia Minis 2015. Show all posts

Tuesday, April 14, 2015

Magnolia-licious™ Tuesday Challenge - Spring Is In The Air.

Hello, it's challenge time again at Magnolia-licious™ Challenge Blog.

Our theme is:

SPRING IS IN THE AIR

Once again Magnolia-licious™ is giving away a delightful surprise package to one lucky winner.  To be in the running, please leave a comment on any of the design teams blogs.
We also want to see what you come up with, so come on board and show us your stuff!


This is my project and although it's a birthday card box, I had fun putting those little springy things into it.


I have used two Mini images for my card box.  #294 Tilda with a Balloon and #241 Dancing Party Tilda.  Diana has a good selection of Mini images in her store if you like the idea of using the images as I have done here. Click on the link to take you directly there.

Here is a close look at the Mini Tildas.  You will also note that the candles are made from rolled dollar bills. =)

Another view of the card with lots of "springy" thingies!!!

Here is a side view...
A little peek from the top of the box...

I made a box envelope for my box card because it doesn't lie very flat with the springy thingies and the rolled up money.  The flap just slides into the birthday candle paper.

Here is the card folded fairly flat and sliding into the box envelope.

Thanks for stopping by to view my project for the challenge.

Many blessings,
Barb


Tuesday, March 10, 2015

It's Blog Hop time...

Welcome friends, welcome spring,(well almost) and  welcome to the Magnolia-licious Challenge Blog March Blog Hop.  
Oh, this is going to be good, very good.

Our theme?  Circles, Spots, Dots and Blots
Fabulous!

If your hopping here from Tamara's blog then you're hopping in the right direction.  If not, please click here to take you back to the beginning of the hop.  You are going to be flabergasted with the stunning array of creativity done by the designers at Magnolia-licious and surely don't want
to miss a single post.

If  you would like to qualify for a prize you must do the following:

1. Like us on our Magnolia-licious Facebook Fan Page
2. Leave a comment on each Designer's post during the Hop
3. At the end of our Hop, return to the Magnolia-licious Challenge Blog and leave a comment there as well as on each DT blog post.

There are two ways to win during our challenge blog hop:
1. Comments are counted and a random winner is chosen
2. Participants enter a project following the Hop Theme ~ Circles, Spots, Dots and Blots and a random winner is chosen.  This person will receive a handmade card from one of the Magnolia-licious Designers.

Well now let's get on with my project for the Hop.  I purchased a wee calendar from a $ Bin at Michaels and took it apart.  I mounted the months on separate cardstock pages and then added a Mini Maggie and embellies to highlight each.  When it was completed, I took it to Office Max and had them spiral bind the pages and the frame I created.

Here is my calendar:

January - please disregard the circled dates - #12 Mini Ski Star Tilda

February - #3046 Mini Sagittarius Tilda

March - #7 It's Cold Outside Tilda

April - #3117 Mini London Tilda

May - #08 Mini For You Tilda

June - #3055 Mini Special Day Tilda

July - #311 Mini Tilda with Lacy Flag

August - #389 Mini Peachy Tilda

September - #07 Mini Write a Message Tilda

#267 - Mini Witch Tilda with Pumpkin

November - #299 Mini Scooter Tilda

December - #161 Mini Lightning Edwin

Whew!  A little picture heavy and I should have warned you ahead of time ; )

I'm sure you're ready to move on to the rest of the hop, soooo 

For your next stop, HOP over to the uber, incredibly talented....


SUZI

to see what she has to share with you.

Don't forget that your comments on each blog post will put your name in the running for a prize.  Don't forget to like us on our Facebook Fan Page and leave a  comment on the Magnolia-licious Challenge Blog site.

Happy Hopping Hugs,
Barb

Friday, February 20, 2015

A little Waterfall fun...

Hello friends, the weekend has finally come, it's been a long and busy week for me, and the weekend is a bit full too!  
So today I'm posting a card I made a long time ago but never posted it to my blog.  

Where I live we are having yoyo weather...80F degrees one day and 35F the next.  It's almost spring, this is typical weather for my part of the country.  My deepest sympathies to those of you living on the easten  portion of our country.  The snow and cold for a second year in a row are really taking their toll. =(

Okay, here is my Waterfall card....


These are such fun cards to create and they go together very quickly.  Here I've used some Computer Image paper and SU card stock.  My images are all Mini's available at Magnolia-licious™ Store.

So if you haven't seen a Waterfall card before here is how it works.  The panel the images are mounted to are scored panel  The front portion of the panel is glued to the top of the CS strip.  Notice that the strip is held down with two small brads.  NO GLUE on that panel.  The back half of that panel is inserted behind the CS strip with just the bottom end showing.  I attached a small piece of ribbon here because you want to be able to pull this part of the strip down.  As you do, each images will automatically be drawn back and under to reveal the next image.  

Let me show you...


Here is the first image #328 Mini Aquarious Tilda.  She flips down to reveal ...


#3109 Gucci Tilda.  If you look carefully, you'll notice that the first image is being pulled back and behind.


This darling mini image is #371 Tilda with Flower Pot.

and finally...

#341 Merry Christmas Tilda.

That's the front of the card.  Now lets have a peek at the inside...=)

On the inside I added a birthday wish and on the salutation panel I also colored Mini #420 Mushroom with Snail.  How cute is that?
Here is how I colored the Mushrooms.

That's it for this time around!  I'll be back on Tuesday with the Magnolia-licious™ Challenge Blog new challenge.  I hope you'll come back to visit then.

Ciao Mi Amici
Barb


Sunday, February 15, 2015

TUTORIAL! How to make a Corner Bookmarker.

Hello paper crafting friends.  After making almost 20 little corner book markers I decided I would do a tutorial - just in case anyone is interested = )

There are skoo-bookim tutorials on You Tube.  You might prefer to google that and see a live video.  I found most of the bookmarks were too large for children's books so I redesigned it to fit.

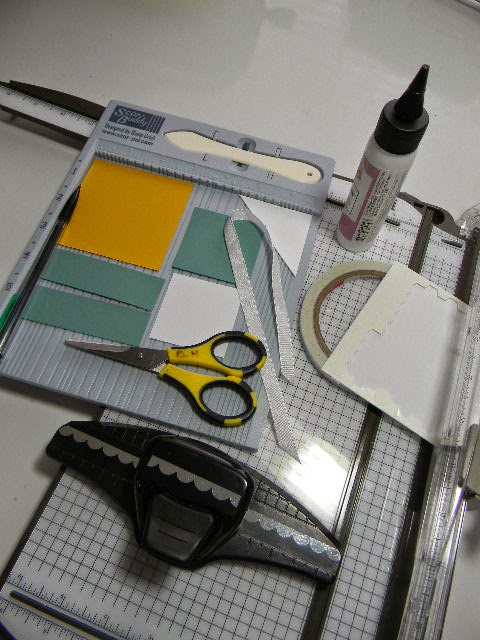
Here is what you will need: (please don't let the many photos scare you off, I'm just a detail addict)


Card stock (color A) cut one  3 1/8" x 3 1/8"
Card stock (color B) cut two 3 1/8" x 1" for front and back border
Card stock cut  2" x 2" (I used Express It Blending Card for my Copic colored image.)
 Card stock (color B) cut 2 1/8" x 2 1/8" for matting your image piece.
Card stock (I use white but it can be any color you decide) cut 2 1/4" x 2 1/4" and then cut on the diagonal.
Ribbon - about 12 inches
Paper Trimmer
Scissors
Pencil and ruler
Score Tool
Edge Punch
Adhesive - either liquid glue or ScorTape
Dimensional dots


First you will cut the 2 1/4" square on the diagonal.  Since it make two pieces you can make two book markers ;)  Lay these pieces aside for a couple of minutes.


Cut the 3 1/8" square and using a ruler or here I've used some SU graph paper,  you will measure 1 5/8" from the corner on three sides of the square. Once you've marked the first two, just flip the square one time and mark the third side.

With your Score tool, score the piece in two places forming a pyramid shape. This is forming the base of the book marker.

Fold the two corners into the center and add a little glue, or adhesive of choice. 


Next, place one of the triangles you created over the folded flaps and be sure it's securely fastened. WARNING!! DO NOT get any glue under this flap or it won't slide onto the page = (


Flip your book mark base over and punch a decorative edge.  Any edge punch will do.  I used here a SU Scalloped Edge punch.

Now repeat this edging process on one of the contrasting 3 1/8" x 1" pieces.  Be sure you line it up so that it matches the book marker base.

Adhere them together and tie the piece of ribbon around both pieces.

On the back of the book marker your going to add the second contrasting strip with adhesive being sure that it's really stuck down.   I brought the bottom edge of this piece down to match the bottom of the scalloped piece to give just a little more depth.  The purpose of this piece is to prevent the corner of the page from getting stuck on the ribbon.

Here it shows how that looks.

Next, I added SU dimensionals to the back of the 2 1/8" square that is the mat for my colored image.  I used dimensionals so that it would rest flat on the front and the the ribbon wouldn't create a bump.

Here's a look at the book marker now.  It's almost completed!

I chose this sweet Mini Magnolia Image for my book marker.  She is #A7 Write A Message Tilda. However you decide to finish the front of your book marker the shape must for a diamond.  I lined up the two opposite corners here to be sure that my image was straight.


Here is my completed project.


The design possibilities are endless for this type of book marker.  Once you've got the basics down you can change it up however you want.  Get creative!

Thanks for giving me this opportunity to share with you...

Many Blessings and hugs,
Ciao
Barb

Friday, February 13, 2015

One little, two little, three little bookmarks and MORE!

Hello dear stamping friends.  
Many of you know that I volunteer with the after school mentor/tutor program our church hosts for some neighborhood children.  One of the sweet kids I mentor/tutor is a delightful fifth grader who absolutely LOVES to read.  She LOVES books about horses!  So got the brilliant idea to make her a book mark.  Well, I also have several other sweeties as well, and I couldn't not include them, right?  You can see where this is going, right?  Yup!  I had to make one for each little girl in our program.  Seventeen in all!  But wait, there's more!  The boys want a book mark too!  Oh, and I forgot that on Wednesdays, we have a small group of deaf children that join us! 

 I'm taking a deep breath right about now.

So I have been so busy making corner book marks for the girls and using Magnolia Minis on them.  I got so caught up in the fun of this project that I failed to take pictures of the first 11 that I made.  They're gone to the children now and I know they won't want to give them up so that I could take a photo.  SO, here are the last of them.  I am doing something totally different for the boys! I also went to a second hand book store and bought every "horse" story book I could find.  I donated them to our program so now everyone can read horse stories without having to wait for a book to be come available. 

I really had fun creating these and it really got my Mojo humming trying to make each one look different from the others.  Here are a few pictures...enjoy!
This is the whole set (missing the first 11)


Two of our kiddos are identical twins.  One of them wears glasses.  They can fight it out as to who gets what color.  I'm not taking up that torch, thank you very much! The image is #3091 Gemini Tilda
Here I've used #3076 Tilda with Cross Necklace.
Several girls wanted one with a pony.  That was the first one I made because my student was reading Black Beauty.  So I made a few more using #A4 Tilda with Angel the Horse.
One child requested a pony one but she wanted a brown horse and a red jacket.  She got it!
Here is #A10 Tilda with Inez the Bunny.  Nice and bright just like the recipient.
Another volunteer asked if I would make one for her grand daughter.  Well of course!  She loves dragons.  I hope she'll like this one  This is #A7 Tilda with Dexter the Dragon.
Finally, here is #A8 Tilda with Elsie Lamb.
Now, I need to get busy and make some much more simple, guy type book marks for the boys.  I won't be doing any coloring on theirs. 

Thanks for stopping by for a visit.  Your sweet comments are always appreciated =)

Blessings and hugs,
Barb