Hello paper crafting friends. After making almost 20 little corner book markers I decided I would do a tutorial - just in case anyone is interested = )
There are skoo-bookim tutorials on You Tube. You might prefer to google that and see a live video. I found most of the bookmarks were too large for children's books so I redesigned it to fit.
Here is what you will need: (please don't let the many photos scare you off, I'm just a detail addict)
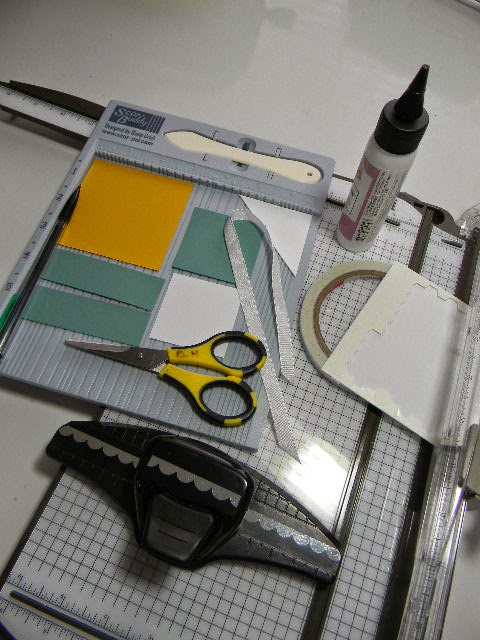
Card stock (color B) cut two 3 1/8" x 1" for front and back border
Card stock cut 2" x 2" (I used Express It Blending Card for my Copic colored image.)
Card stock (color B) cut 2 1/8" x 2 1/8" for matting your image piece.
Card stock (I use white but it can be any color you decide) cut 2 1/4" x 2 1/4" and then cut on the diagonal.
Ribbon - about 12 inches
Paper Trimmer
Scissors
Pencil and ruler
Score Tool
Edge Punch
Adhesive - either liquid glue or ScorTape
Dimensional dots
 |
| First you will cut the 2 1/4" square on the diagonal. Since it make two pieces you can make two book markers ;) Lay these pieces aside for a couple of minutes. |

 |
| Cut the 3 1/8" square and using a ruler or here I've used some SU graph paper, you will measure 1 5/8" from the corner on three sides of the square. Once you've marked the first two, just flip the square one time and mark the third side. |
 |
| With your Score tool, score the piece in two places forming a pyramid shape. This is forming the base of the book marker. |
 | ||
| Fold the two corners into the center and add a little glue, or adhesive of choice. |
 |
| Next, place one of the triangles you created over the folded flaps and be sure it's securely fastened. WARNING!! DO NOT get any glue under this flap or it won't slide onto the page = ( |
 |
| Flip your book mark base over and punch a decorative edge. Any edge punch will do. I used here a SU Scalloped Edge punch. |
 |
| Now repeat this edging process on one of the contrasting 3 1/8" x 1" pieces. Be sure you line it up so that it matches the book marker base. |
 |
| Adhere them together and tie the piece of ribbon around both pieces. |
 |
| On the back of the book marker your going to add the second contrasting strip with adhesive being sure that it's really stuck down. I brought the bottom edge of this piece down to match the bottom of the scalloped piece to give just a little more depth. The purpose of this piece is to prevent the corner of the page from getting stuck on the ribbon. |
 |
| Here it shows how that looks. |
 |
| Next, I added SU dimensionals to the back of the 2 1/8" square that is the mat for my colored image. I used dimensionals so that it would rest flat on the front and the the ribbon wouldn't create a bump. |
 |
| Here's a look at the book marker now. It's almost completed! |
 | ||
| I chose this sweet Mini Magnolia Image for my book marker. She is #A7 Write A Message Tilda. However you decide to finish the front of your book marker the shape must for a diamond. I lined up the two opposite corners here to be sure that my image was straight. |
 | ||
| Here is my completed project. |
The design possibilities are endless for this type of book marker. Once you've got the basics down you can change it up however you want. Get creative!
Thanks for giving me this opportunity to share with you...
Many Blessings and hugs,
Ciao
Barb
Fabulous tutorial Barb, very clear with great instructions. Love your bookmark. Hugs Suzi x
ReplyDeleteThanks so much for sharing Barb!
ReplyDeleteThanks for the tutorial Barb. Great photos with details, and easy to follow.
ReplyDeleteHugs Elin xxx
Love your bookmark! Great tutorial too!
ReplyDeleteVery sweet and useful too, nicely done Barb
ReplyDeleteHugs Julie P
Cute bookmark! Thanks for the tutorial.
ReplyDelete