After finishing another card for an upcoming challenge, I got busy this weekend making some more of those sweet little Mini Tissue Boxes. This time instead of gluing down the sides to the box, I actually made a box that would slide over the top of the box. When the tissues are gone, just replace it.
I have to admit that I struggled a little making up my first box. I'm useless with math, and trying to get the lid to be the right size for the box put me out of my comfort zone. But I finally got it down and decided to keep going with a second and third before I forgot my formula.
Here is the first cover I made. It's quite plain, even though I embossed the top and used a Nelly Snellen die for the tissue outlet and sponged the edges of the lid, but I didn't want to distract from the sweet images. I call this one Tilda Around the World. I used four images
#229 Mini Cowgirl Tilda, #303 Mini Spanish Tilda, #332 Mini India Tilda and #290 Mini Chinese Tilda. All of these images are available from Diana at the Magnolia-licious online store. Just click on the link above and it will take you to the home page.


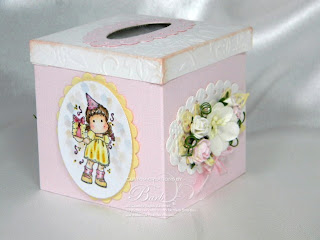
Then I wanted to get girly and fussy so I made another Mini Tissue Box Cover using SU Shimmer White for the top and Pirouette Pink (or Bazzill facsimile) for the bottom. I again embossed the top and also embossed the die cut piece around the tissue opening. I then cut two more of those openings and embossed them and used them on two sides of the box. I decorated those ovals with some pretty flowers from Wild Orchid Crafts. I used my Marianne Dies for the leaves and then decided to make this little box a birthday theme. So I used#294 Mini Tilda with a Balloon and #233 Congratulations Tilda for the remaining opposite sides. As you can see soft pink, soft yellow and white are the theme here.

For my final Mini Tissue Box cover I went with a Christmas theme. This box took me forever to pull together and it's the least favorite of them all. I started out with Cherry Cobbler and Old Olive Card stock for the box and once I got it put together I didn't like it at all. Rather than throw it out I walked away from it for a while. Then my dear hubby suggested that I use some Christmas dp to cover the sides with. Oh, thought I, that just might work. So I sorted through my horde of Christmas dp and decided that most of it was much to busy to really work with the images. In the end I found this plaid which I thought worked quite well. So I covered the side and applied my images. Hmmmmm, still not happy with that, so I took the oval die cut off the top and redid it in the plaid. Okay, that works better! I added some pearls to it and really liked that, but the box was still too plain. I dug through my cut ribbon box and found some nice Christmasy red ric rak and glued it to the edge of the top....okay, now we're cooking. Then I added the tinest of pearls around the scallops of each image and put a larger pearl along the top of the ric rak. Okay, I better leave it alone now...leave well enough alone.


Then I pulled out another little notebook that has it's own little pen and covered it with some pretty dp from a 6X6 stack called Rose Garden by Papermania. Then I colored with sweet Tilda #3011 Tilda with Straw Hat also available from Diana at Magnolia-licious. Rather than covering that pretty paper with a mat and then Tilda, I cut Tilda out and glued her directly to the paper. It works for me!

So that's what has kept me going through this exceptionally hot weekend. All of the items will be available in my ETSY shop. The kids were well behaved, I had a visit from my friend and even took a nap this afternoon. Thanks for stopping by my blog, it's so much appreciated...
Hugs and blessings,
Barb
I have to admit that I struggled a little making up my first box. I'm useless with math, and trying to get the lid to be the right size for the box put me out of my comfort zone. But I finally got it down and decided to keep going with a second and third before I forgot my formula.
Here is the first cover I made. It's quite plain, even though I embossed the top and used a Nelly Snellen die for the tissue outlet and sponged the edges of the lid, but I didn't want to distract from the sweet images. I call this one Tilda Around the World. I used four images
#229 Mini Cowgirl Tilda, #303 Mini Spanish Tilda, #332 Mini India Tilda and #290 Mini Chinese Tilda. All of these images are available from Diana at the Magnolia-licious online store. Just click on the link above and it will take you to the home page.


Then I wanted to get girly and fussy so I made another Mini Tissue Box Cover using SU Shimmer White for the top and Pirouette Pink (or Bazzill facsimile) for the bottom. I again embossed the top and also embossed the die cut piece around the tissue opening. I then cut two more of those openings and embossed them and used them on two sides of the box. I decorated those ovals with some pretty flowers from Wild Orchid Crafts. I used my Marianne Dies for the leaves and then decided to make this little box a birthday theme. So I used#294 Mini Tilda with a Balloon and #233 Congratulations Tilda for the remaining opposite sides. As you can see soft pink, soft yellow and white are the theme here.


For my final Mini Tissue Box cover I went with a Christmas theme. This box took me forever to pull together and it's the least favorite of them all. I started out with Cherry Cobbler and Old Olive Card stock for the box and once I got it put together I didn't like it at all. Rather than throw it out I walked away from it for a while. Then my dear hubby suggested that I use some Christmas dp to cover the sides with. Oh, thought I, that just might work. So I sorted through my horde of Christmas dp and decided that most of it was much to busy to really work with the images. In the end I found this plaid which I thought worked quite well. So I covered the side and applied my images. Hmmmmm, still not happy with that, so I took the oval die cut off the top and redid it in the plaid. Okay, that works better! I added some pearls to it and really liked that, but the box was still too plain. I dug through my cut ribbon box and found some nice Christmasy red ric rak and glued it to the edge of the top....okay, now we're cooking. Then I added the tinest of pearls around the scallops of each image and put a larger pearl along the top of the ric rak. Okay, I better leave it alone now...leave well enough alone.


Then I pulled out another little notebook that has it's own little pen and covered it with some pretty dp from a 6X6 stack called Rose Garden by Papermania. Then I colored with sweet Tilda #3011 Tilda with Straw Hat also available from Diana at Magnolia-licious. Rather than covering that pretty paper with a mat and then Tilda, I cut Tilda out and glued her directly to the paper. It works for me!

So that's what has kept me going through this exceptionally hot weekend. All of the items will be available in my ETSY shop. The kids were well behaved, I had a visit from my friend and even took a nap this afternoon. Thanks for stopping by my blog, it's so much appreciated...
Hugs and blessings,
Barb
Wow!! you have been busy Barb, these tissue boxes are fabulous, I love the stamps and papers you picked for all 3 styles, and your note book is adorable.
ReplyDeleteLouise
Wonderful work Barb - amazing!
ReplyDeleteSandy
O whats beautiful works you have used.
ReplyDeleteI love she.
Hugs Renate
These are gorgeous Barb! I love the tissue boxes! Your coloring is wonderful and love the colors you chose for each box! Beautiful work! hugs, Angela
ReplyDeleteBarb, your tissue boxes are adorable...I'm sure they'll be a hit in your shop! Have a great week!
ReplyDeleteWow! You have been busy! THey all look great! : )
ReplyDeleteVery nice Barb! The tissue boxes are wonderful. Hugs~
ReplyDeleteCorinne
You did an amazing job on those boxes! I especially like the pink one with all the flowers. You card is super pretty too. That's one of my favorite Tilda's :)
ReplyDeleteThey are all so cute Barb !!!
ReplyDeleteHugs Monique
No wonder we haven't been chatting that much, these are stunning!! i love that you found a way to make a box over the tissue box, how ingenious you clever girl!! these are stunning Barb, pity you didnt share the tutorial with us, hint hint!
ReplyDeleteLuv ya lots
smiles
Paola
Oh my gosh, they are all just too adorable, Barb!!! How sweet, especially loving the pink and yellow one, my colors and so girly!!!! Hope they were able to keep your mind off all the other stuff for a while!
ReplyDeleteHugs,
Teri
Hello Barb, OH! how pretty! those tissue boxes make such a lovely gift. They are all so pretty and make a very decorative piece. Love all those Tildas and Edwin too.
ReplyDeleteand your coloring is just beautiful.
OMGoodness your projects turned out great
ReplyDeleteeven the CHRISTMAS one that you were not happy with at frist...keep inside and stay out
of our Texas heat
hugs Linda
Hey Barb!
ReplyDeleteThose tissue covers are pretty indeed. Aren't they fun to make! Luv all the tildas going on with all three of them... and your notebook is pretty too.
Love all your wonderful projects....especially partial to the holiday tissue holders!!!! What a clever way to use the minis! Beautiful job!
ReplyDeleteWow! Barb, you have been a very busy girl. These are all wonderful creations. So glad you shared them.
ReplyDeleteHugs
Suzi x
ohhhh, their all so cute! Love the mini tissue holders - fantastic! And your note pad...simply cute!!
ReplyDeleteBarb, these are fabulous! You've inspired me to get back to my tissue boxes again. Love your work
ReplyDeleteHugs Julie P
Wow, these are all lovely. I need to make one of those tissue boxes. TFS.
ReplyDeleteAll your projects are gorgeous, tons of minis. Really cute.
ReplyDeleteFabulous I love these!!!! What a super job!!!!Wow another excellent creation from you!!!! Way to go!!!!
ReplyDeleteThese are just delightful, Barb! You always do such wonderful work! I don't know which box I like more than the others as they are all just too cute! Thank you for the inspiration. Now, send me the courage to try to do one, too! LOL
ReplyDeleteXO,
Chris
Wow Barb, you've been busy creating all these wonderful mini tissue box covers and note pad! They're all so beautiful!
ReplyDeleteHugs, Cami
Your tissues boxes are absolutely fabulous Barb. I'm more partial to the Pink one... looks so delish! Although they are ALL stunning! TFS, hugs Sharon
ReplyDeleteAll of your boxes are gorgeous! What a fantastic job coloring and creating the boxes. They are just beautiful. How do you ever find time to sleep let alone doing all the other chores a mom has to keep up with!?!
ReplyDeleteHuggeroonies,
Kathy
BARB!!!!! These are AMAZING! Just fabulous...so gorgeous!!!
ReplyDeleteRene :D
LOVE< LOVE< LOVE> your projects! They are so well put together and CUTE!!!!
ReplyDeleteWow Barb, fabulous coloring. Love it.
ReplyDeleteHugs Maz