Friday, January 30, 2015

Two little thank you's...

Good morning my dear blogging friends.

 I was recently asked to make two fruit and candy baskets for the staff and teachers at our neighborhood school. We work closely with them, taking 25 students, 5 days a week, into our after school program at church where we mentor them, tutor them and teach them the Bible. They also have a healthy snack and plenty of play time to burn off their energy.

 I help out two afternoons a week and totally love it. So when the challenge was given me I decided that a thank you card for each basket was totally necessary. The cards are really bare on the outside. I knew the cards would be discarded and didn't want to lose too many embellies to the trash. I'm just saying.... So here are the two cards. The colors I used are the colors chosen for our program. All the volunteers wear this pretty blue or a light green. The shirts have our logo and our names on them...but I digress.
 Here are my two cards :-)


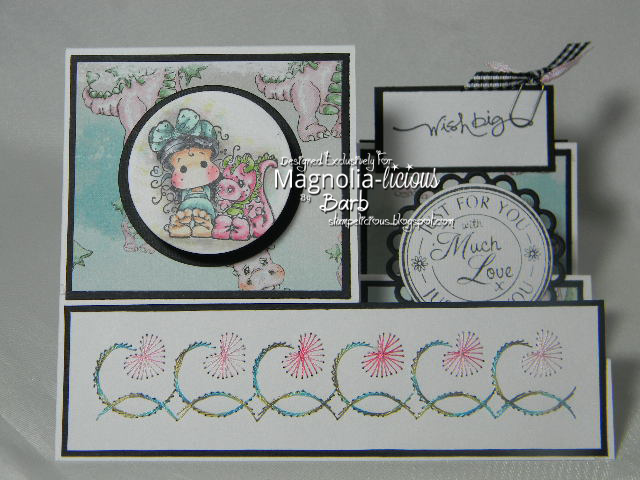
This is #280 Tilda Loves Flowers.  She is colored with Copics and a little touch of Adirondack Lights in the backsground.

This sweetie is #308 Tilda with Many Hearts  I used Spellbinders Labels 10 for the shaped panels on each of the cards.
Here is a closer look at how I colored this Tilda.  Don't you just love the red hair?
And a closer peek at how I colored Tilda with many hearts. 


It's Friday, so I'm wishing you all a very crafty weekend!
 Ciao and hugs, 
Barb

Tuesday, January 27, 2015

Magnolia-licious™ Challenge #2 Winter Fun with Doohickey Dies

G'day mates! Buon giorno! Howdy y'all!  Come va?  I wanted to begin this post with a little welcome in three different languages...not that Australian is different, but the phrases are so fun!

Today is Challenge #2 on the Magnolia-licious™ Challenge Blog.  Our theme is "Winter Fun with Dookickey Dies".  There will be tons of inspiration from the DT so just click on the link above to take you to the Challenge Blog, see what everyone has done and then join in the fun.

Anyone who comments on the different DT blogs will be entered to win a secret surprise from Diana at Magnolia-liciousSo please visit the site, leave comments on  each gal's blog and then enter to win!

 
I have for you today a twelve drawer box which I began a few months ago, kept putting it aside when something more pressing came along, but decided to finish it with some Doohickey Dies and use it for the challenge. There are lots of pictures here so please bear with me... 


This is how the top of my box looks.  This is an Easel Card closed so that you see it completely.  I used #317 Virgo Tilda and I think she is just so versatile. There are several Doohickey elements used on this card which are shown in more detail below.

Here is a closer look at Miss Tilda and you can see the Doohickey Vintage Heart Tag pulled out and open to reveal the sentiment.  The Tag is tied with some gold tulle and SU Basic Grey Satin Ribbon.  I have also used Doohickey Flourish die, the leaves are from the Christmas Die Club kit and the Chandelier glass is from Magnolia as well.

Here is a very close look at Miss Tilda and the flowers.  As you can see I have used a different technique to display her. These little squares are called "Inchies" and there are a dozen different ways to use Inchies.   I divided the card into equal 1" size squares and mounted them on so Basic Grey CS then to stabilize it I mounted the whole think onto a piece of yellow CS.  The added little pearls are from my stash.

This is not the best picture of sweet little Tilda with Bow Knot,  but I wanted to show you the easel card open.  The dies used here are from Go Create, Spellbinder Fancy Labels and Classic Circle and Scalloped Circle.  The sentiment is from LOTV.

Here is side two.  I have pulled out the drawers a little to show you that they do indeed open.  This darling Tilda is Mini Tilda with Daiseymae Tiger. She is retired, but there are still many darling images from this Collection and many more.All the sides were cut with Spellbinder Nestabilities Classic Ovals.

Here is side three.  I have used  Mini Tilda with Dexter the Dragon

The final side of my little box.  Here I have used Mini Tilda with Millie the Mouse.  All of my images have been colored with Copics and Adirondack Lights.
 

That about wraps it up for this session. I hope you'll be inspired to use some of your Dookickey Dies which may have collected some dust ;-}. So lets see your creativity on the Challenge blog soon. Ciao Barb

Saturday, January 24, 2015

Just a little fun....

Hello, bloggin' friends.  
Well I came up with a new fun card this weekend.  Not actually totally new, but I found a web site where the woman makes this technique just so VERY easy.  Deb Valder is her name and she had an awesome website.

Anyhoo, this is a short post as I'm trying to finalize a few more projects.

Here is my Flip Card.....
I have used #413 Mini Edwin's Oldsmobile and over stamped with#415 Lazy Day Summer Flowers.  The paper is from SU, this series I particularily LOVE. Ive used Labels 18 from Spellbinders as the shape for my "flip" part.

Here is what the card looks like fully opened to this side.
Here is the reverse side of the card with a LOTV sentiment.  Since this is a retirement card for a guy I didn't ad any embellies, honestly, a flower or two would have been just fine but men are so funny about the frilly stuff *sigh*

Here is the back of the card fully opened.  Now I just need to find a guy who is retiring.
Hope you've enjoyed your visit today...I have fun sharing my creations with you....

Buona notte
Barb

Monday, January 19, 2015

Shadow Boxing...

Good morning sweet ones!  Hope you had a wonderful crafty weekend as I did.

I have a really fun card to share with you today.  I got the instructions for this card from my friend and I though it was so cute I just had to give it a try. 

It's called a Shadow Box card and I liked that the shadow box was just the right size to fit on an A2 card and display a Mini Maggie as well.  The paper is new from SU.


I've used an embossing folder for the front of the card, used a Dookickey Oh La La Die Club die for the sentiment and just some ribbon from my stash.

Here is a close up of #3021  "Love, Love, Love Tilda" from the Special Moments Collection.

This part turned out really cool.  I cut 4 X 1 1/2 pieces of the same design paper (SU) and cut them in half diagonally.  They I laid them out on the top of this inside portion of the card and flipped every other one to get a pattern.  Ya fiddle with this part a little so that they fit perfectly together and then trim off the unnecessary parts.  I then punched out a pocket with the pocket die from Dookickey Club Collection #1 and glued it below the edges of the rainbow shape.  I've had the little Coupon Tag for years and this is the first time I've used it.  The sentiment on the bottom was part of the Coupon Set.  All buttons, pearls, ribbon etc are from my stash.

This is my salutation page of the card.  I stamped the same little tilda  Memento London Fog ink and added the sentiment from at SU set of sentiments.

Here's a look with the coupon removed

How the coupon fits into the pocket.


Thank you all for stopping by my blog today, your visits make such a difference to me.

 Blessisngs and hugs, Ciao Barb

Tuesday, January 13, 2015

Magnolia-licious™ Tuesday Challenge - Love is in the Air

Hello dear friends and welcome back to my blog.  This is my first Tuesday Challenge post for 2015 and I'm excited to be joining Team A for the Tuesday Challenges.

At Magnolia-licious™ Challenge Blog we are kicking off the new year with the theme "Love is in the Air".  I know when you visit the other DT members, you'll come away with lots of inspiration AND we want to see what you can come up with.  You have the whole month of January to create something sumptuous and post it to the Challenge Blog.  I can't wait to see what you've come up with. (see the end of my post)

Here is what I have done...(you will have seen my other card in last weeks post, but I did this card first and especially for the challenge.)


I made a Side Stair Step card using #A7 Tilda with Dexter the Dragon

This is a closer look at my coloring.  You can't tell here that the image is mounted on a Wobbly...

I haven't done any Stitching on Cards for a long time.  I felt it was time to bring this delightful art back to my work.  I use variegated machine embroidery thread to stitch on my cards.  I love how it changes color and gives movement to the pattern.

Here is a side view of the card.  Now you can tell that Tilda is standing up and away from the mat background.  My sentiments are from SU and LOTV.

Here you can see the Wobbly at work.  I had so much fun with this card and am looking for other creative ways to use these fun embellishments.

I even finished the back of my card.  On the smaller panel I put my signature at year made.


Now it's your turn. You have the entire month of January to get creative and post your work to the challenge blog.By leaving comments on the DT blogs your name will be entered into the drawing for a wonderful surprise package from Diana at Magnolia-licious™


Ciao Ciao,
Barb

Hehehe, if you have followed this post to the bottom I will share with you that I'm learning Italian!  My vocabulary is that of a 2 year old, but I'm working at it every day.  I'm having so much fun!!!

Buona giornata
(have a good day!)

Tuesday, January 6, 2015

Wobbly Get Well...

I made this card for a friend of mine who fell on Christmas Day and broke her wrist - badly! 

 I had a lot of fun with it as I had just found these "Wobbly's" in Hobby Lobby and wanted something to use them on.  They are small plastic springs with adhesive on both sides.  They make your image wiggly wiggle.  I couldn't resist! ;-9

Okay so here's my card...

Ive used #304 Matryoshka Tilda and she is colored with Copics and Adirondack Lights.  I found a few sheets of 6 x 6 from an old paper stack and fussy cut them the best I could.  I also did some hand embroidery on a panel with variegated embroidery thread.  Both of the sentiments are from  SU.

Here is a side view of my card and you can see that my image (though a hair off center) is attached with a Wobbly and so doesn't sit directly against it's frame.

Here is the back of my Side Stair Step card.  Again I used some coordinating paper from that stack and fussy cut what was a border and mounted it on black mat. 

Here is the best photo I could get of the Wobbly.  I'm having so much fun with these.  I actually made this card after another one which will be posted next week.  They are similar in style.

That's all I have for today.  Thanks for stopping by my blog and taking a peek at my Wobbly work!

Blessings and hugs,
Barb