Note Card Pocket Booklet
I posted today a sweet Note Card Pocket Booklet. This was a fun project to make and I would like to share with you a tutorial so you can make one for yourself.
Here is what you'll need to make the Booklet:
Double sided heavy designer paper or cardstock
A paper trimmer
A Scoring devise
ScoreTape and a good quality quick drying glue
Scissors
Bonefolder
Corner Rounder
Pocket #1
Cut your DP 6" x 7 1/2". Place the DP, inside facing up onto your scoring tool.
Score the 6" side at:
1/2", 1", 5" and 5 1/2 "
Turn the paper around and score the 7 1/2" side at"
1", 1 1/2", 4", 4 1/2", and 5"
Step 2: The Bottom half of the pocket is the side which has the 1 and 1 1/2" score lines.
Cut the three corner squares or areas away and cut slits along the remaining little square to create two tabs.

Cut the three corner squares or areas away and cut slits along the remaining little square to create two tabs.
On the other end of your paper cut away all of the scored areas as shown below.

Now this is what your piece will look like. Using your bone folder press each score like so that it is a crisp fold.

Now your going to create the first pocket. Add a little bit of glue to each tab and fold it into the side of the pocket. Push the pieces together. Repeat on the other side.

Fold those side pieces in toward the center of the pocket as you see below. Add a strip of adhesive only to each side of the front flap to the first score line. If you put it all the way down that flap it will stick to the Note Cards you are going to store there.

Remove the paper backing from the adhesive and carefully line up our bottom with the sides. Press to hold in place.

Use your corner rounder to round the corners of the top of your pocket. This is going to be the front flap which holds the pockets together. Set this pocket aside while you construct the bottom pocket.

Pocket # 2
Cut another piece of DP 5" X 6"
Score the 5" side at:
1", 1 1/2", 4" and 4 1/2"
Score the 6" side at:
1/2", 1", 5", and 5 1/2"
You are going to cut the three corner pieces from each of the bottom corners of your pocket and cut slits going toward the center.

On the other end of you pocket your going to cut away the entire corner - no flaps on this end. Again the bottom of the pocket is the area where you scored on the 1" line.
I have put a piece of black cardstock here so that you can more easily see the shapes.
Once again your going to glue the tabs and adhere them to the side. Then apply ScorTape to the flap and create your pocket.
It should look like this...


The top flap of the pocket needs to be folded away from the inside as this is the piece that will adhere to the top pocket. You'll see in the next few photos.

Turn both pockets over so that their back side are facing up.

Even though these two areas are 1/2", the 1/2" ScorTape was just to wide so I applied 1/4" tape to one side of the top pocket and the opposite side of the bottom pocket flap.


Make sure you keep that bottom flap folding back on itself as you adhere the two pocket together.

This part of the process is finished! Fold the bottom pocket up and bring the large top flap over to create your Booklet. To hold it together you will need a little circle of self adhesive Velcro. Now you can decorate your Note Card Pocket Booklet.

Here is my finished Pocket Booklet and how I decorated it. The possibilities are endless!

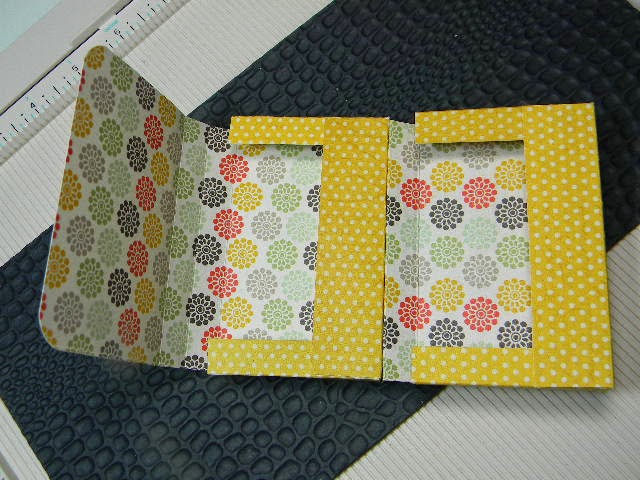
Here is the open booklet with note cards and envelopes inserted.

The set together. I used Vellum for the envelopes and
used a MS corner punch to finish the closing flap.

Here is he front of the note card.

That's it for this tutorial. I hope my instructions were clear enough for you to
make one (or two) for yourself.
Enjoying the journey,
Blessings,
Barb
This is just lovely, Barb! Thanks so much for the step by step process. You always manage to make things that are lovely!
ReplyDeleteXO,
Chris
Thank you, thank you for this!!! I just loved yours and was hoping to figure out where to find directions!!!!! You rock!!
ReplyDeleteHugs,
Teri
First things...FIRST!!! I was so excited to see your beautiful projects show up in my email!! SO EXCITED! You have certainly been missed!! Your project is a delight..and your tutorial is spot on...and your coloring is divine! I see you haven't missed a step!! ♥
ReplyDeleteThanks for the wonderful tutorial Barb. I may have to give this a try! Very inspiring!!!
ReplyDeleteHugs, Cathy-Lynn
Wonderful tutorial Barb, thanks for sharing it.
ReplyDeleteHugs Diane
Thank you for sharing, Barb!
ReplyDeletehappy 2014!
Caryl
Thanks for the wonderful tutorial Barb, I'll have to give this a go when I get some time
ReplyDeleteHugs Julie P